


مدونة
Feature Wall and Built-In TV Unit in Riyadh: How It Is Designed and Fitted
المنزل / الأعمال الخشبية المخصّصة / Feature Wall and Built-In TV Unit in Riyadh: How It Is Designed and Fitted
A wood-clad feature wall with a raised decorative panel and a built-in TV unit usually moves through eight steps with four written sign-offs: survey, shop drawings, samples and TV specification, manufacture, factory check, wall installation, unit installation and snag list. The two details that decide whether it works are the cable and ventilation route behind the TV and the alignment of every panel to the raised panel.
In this article
- What does a feature wall and TV unit package actually include?
- How is the survey done before anything is drawn?
- How are the panel layout and joints designed?
- How does the raised decorative panel align with everything around it?
- How should a built-in TV unit handle cables and heat?
- Which finish and material choices matter most?
- What is the installation sequence on site?
- What goes on the snag list at handover?
- How does this compare with a different approach?
A wood-clad feature wall with a raised decorative panel and a built-in TV unit is one of the most requested living-area packages in Riyadh villas, and one of the easiest to get wrong. This guide walks through how the work is normally surveyed, designed, built and fitted, so that a villa owner or a designer can judge what to ask a joinery contractor before signing. The photograph below shows a finished wall of this type and is used to illustrate the details discussed.
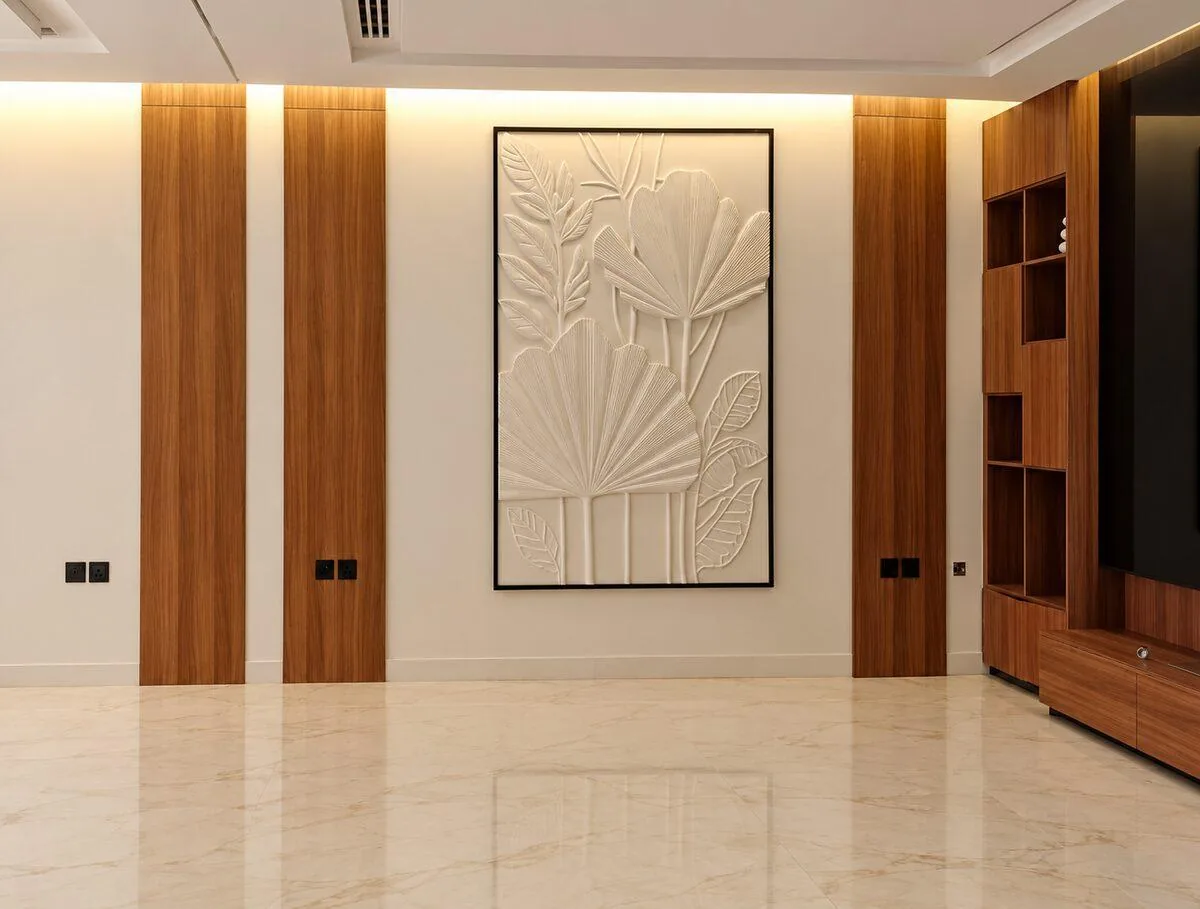
What the photograph shows: three tall panels in a warm wood tone running from floor to the ceiling cove, a black-framed raised panel with a botanical relief at the centre of the wall, switches and sockets set neatly into two of the panels, a shelving and cabinet unit at the right that frames the television, and concealed lighting along the ceiling edge. The sections below use these elements to explain the standard NBELCO process for this kind of scope.
What does a feature wall and TV unit package actually include?
Clients usually describe it as one wall, and contractors price it as five different things. Understanding the split is the first protection you have against a vague quote. The wall panels are a cladding job: boards or veneered panels fixed to a prepared wall, with joints, shadow gaps and edges decided in advance. The raised decorative element is a mounting job, because it has to sit true to the panels around it while being fixed to a different material. The TV and shelving unit is a cabinet job with a service route. Lighting, if it is integrated, is an electrical interface that joinery has to leave room for. And the finish is a coordination job: the tone of the panels, the tone of the unit and the tone of the floor have to agree under the light that will actually fall on them.
A good joinery contractor in Riyadh separates these in the quote so you can see where the cost sits. If you are comparing two offers, the checklist in our guide to getting an accurate joinery quote in Saudi Arabia shows what each should state. For this scope the lines to look for are: panel supply and fixing, TV unit carcass and doors, cable and ventilation provisions, finishing, transport, and installation with a snag visit. Price depends on those items and on the materials, so we do not quote figures in articles. Contact us for rates once you have drawings or photographs.
How is the survey done before anything is drawn?
The most expensive mistakes in wall joinery start with a measurement taken in the wrong state. If the plaster is not finished, if the floor is not laid, if the ceiling detail is not final, the dimension you take is a guess. A feature wall that runs from floor to a lit cove is especially sensitive to this, because the visible gap at the top and bottom is a design element and not a trim you can hide.
The standard survey for this scope records the following, with photographs of each:
- Wall flatness: a straight edge held vertically and horizontally in several places, noting where the wall bows in or out and by how much
- Plumb and square of both side walls and the ceiling line, because a ceiling cove is rarely perfectly level
- Finished floor level at several points, and the thickness of the floor build-up if it is not laid yet
- Position and height of every existing socket, switch, data point and air-conditioning outlet on or near the wall
- Location of the TV power and signal supply, and whether a spare conduit is already in the wall
- Concealed lighting positions and the depth of the cove or recess above the panels
- Access path for the finished units: door widths, lift or stair, corridor turns
- Wall construction at fixing points, because block, concrete and gypsum partitions take fixings very differently
Two things are noted that clients rarely think about. The first is the datum: a single finished-floor reference line that all vertical dimensions are taken from, so the panels, the unit and the raised panel share one origin. The second is the state of the wall behind the cladding. Moisture, fresh plaster and uneven render each need a decision before wood goes up: wait, seal, or build a frame that stands off the wall.
How are the panel layout and joints designed?
Vertical panels at a regular spacing look simple and are unforgiving. The eye reads the vertical lines as a rhythm, so any variation in width, gap or verticality shows up from across the room. The layout therefore starts from the wall, not from the board size. The designer fixes the visual centre first, usually the raised panel or the TV, then sets the panel width and the gaps so that the pattern is symmetrical or deliberately offset around that centre, and only then checks how it divides into available board sizes.
In the photograph the panels are narrow, tall strips with plain wall between them. That layout puts the responsibility on the gap: a strip placed on a wall that is out of plumb will show the error against the plain surface beside it. In the standard process this is handled in three ways. Strips are fixed to a levelled batten or sub-frame, shimmed to plumb instead of following the wall. Their top and bottom ends are cut after fixing for a scribe to the cove and floor, or are finished to a fixed reveal that hides small variations. And every panel is numbered at the factory so the grain and tone sequence runs left to right in the order it was selected.
If grooves are specified, either machined into the face or created by the gap between panels, they bring extra requirements. A groove is a shadow line, and shadow lines show every misalignment. Grooves must be set out from the same datum as the panel edges, and the groove depth must be sufficient to read as a shadow but not so deep that dust and cleaning become a problem. When the groove is machined, the cutter pass and the finish coat should be tested on an off-cut, because a finish that pools in a groove darkens it.
| Decision | Option | What to weigh |
|---|---|---|
| Panel construction | Solid-faced veneer panel or laminate board | Veneer reads as natural wood and can be refinished; laminate is more uniform in tone and resists scuffs; the choice must be made with the sample in the room's real light |
| Edge treatment | Square edge, small chamfer or banded edge | Chamfers hide small gaps; a square edge needs tighter machining; edge banding must match the face |
| Fixing system | Direct fixing, batten frame or concealed clip rail | Clip rails allow removal and fine adjustment; direct fixing is simpler but offers no adjustment once glued |
| Gap between panels | Tight joint or open reveal | An open reveal forgives small errors in width; a tight joint shows every difference |
| Top and bottom termination | Scribe to cove and floor, or fixed reveal | Scribing hides an uneven line but needs time on site; a reveal needs accurate levels |
| Switches and sockets | Cut in the panel, or kept in plain wall | Cut-outs must be marked on the drawing, with the faceplate sized to cover the cut |
The photograph shows switches and sockets set into two of the panels, which is a decision the drawing has to make before manufacture. The cut-out should be made at the factory with a template from the electrician's marked positions, with the faceplate overlapping the edge by a few millimetres. A cut made on site with a hand tool tends to show.
How does the raised decorative panel align with everything around it?
The raised element at the centre of the wall is the part that people photograph, and also the part that exposes every error around it. It sits within a dark frame, so a gap between the frame and the wall or a tilt of a few millimetres reads immediately as a line. It is also usually heavier than it looks and often supplied by a different maker than the joiner.
The standard NBELCO-style approach to a feature panel of this kind starts with the question of who supplies and who fixes. If the relief panel is made elsewhere, the joinery drawing needs its exact outer dimensions, its weight, its fixing points and its tolerance. The frame, the wall panels on each side and the cove above are then dimensioned from it, not the other way around. Weight sets the fixing: a heavy panel on gypsum needs a back-plate or a fixing into the structure behind, not wall plugs. The panel should be dry fitted against the wall panels in the workshop where possible, and it should hang from adjustable fixings so the last millimetre of level can be set on site.
The relationship that matters most is the sightline. Standing at the sofa, the eye compares the top of the raised panel with the top of the panels on each side, and its centre with the centre of the wall or the TV. If the strips on either side have different heights from the cove, or if the centre of the raised panel is offset against the unit on the right, the discrepancy is noticeable even to someone who cannot say what is wrong. For that reason alignment lines are drawn on the shop drawing with dimensions to the same datum, and are checked with a laser line before the panel is fixed.
How should a built-in TV unit handle cables and heat?
This is the section a TV unit buyer should read twice, because it is where most built-in units quietly fail. A flat TV needs power and one or more signal cables. A set-top box, a receiver or a games console needs power, signals and air. If the unit is designed from the outside only, the cables end up hanging down the wall or squeezed through a drilled hole, and the equipment shelf becomes a closed box that gets warm.
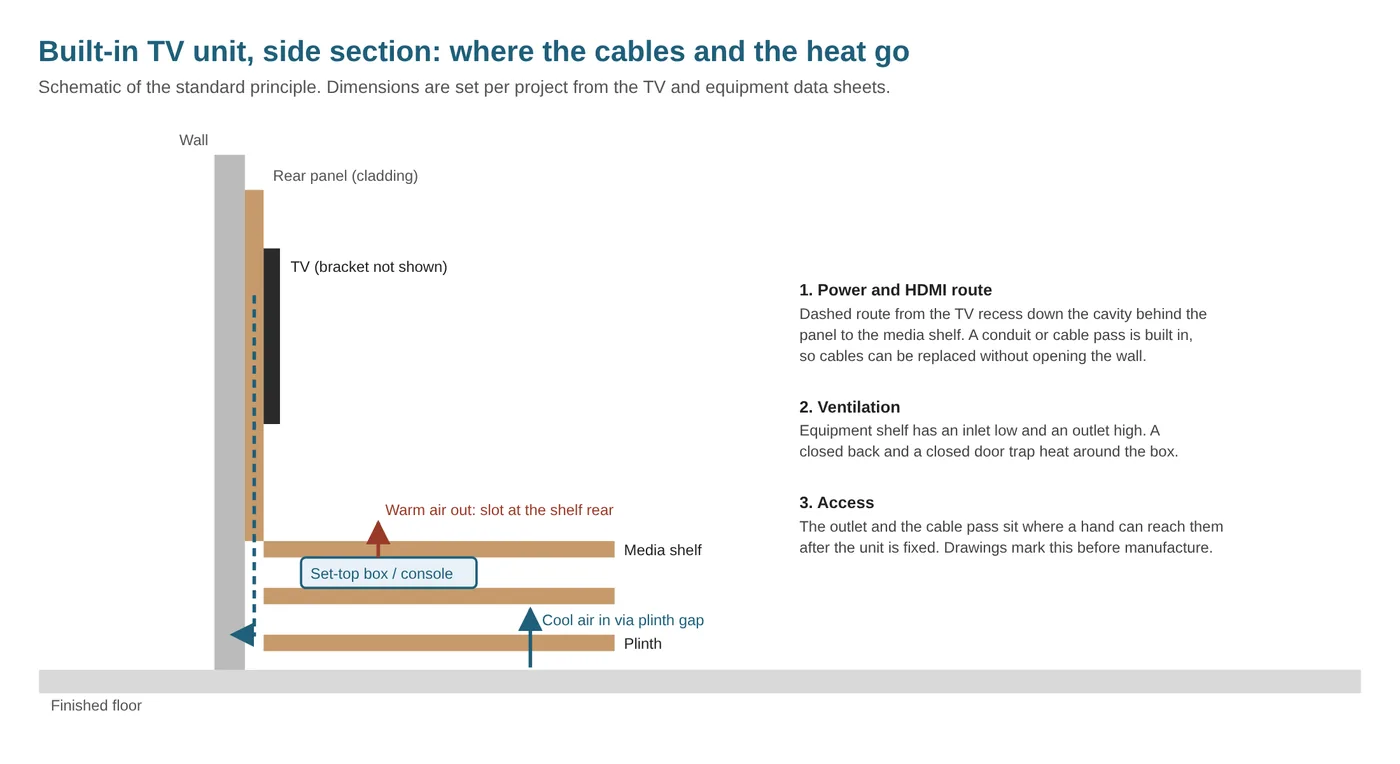
The standard design for this scope has four provisions, all marked on the shop drawing and agreed with the electrician before manufacture.
- A cable route from the TV position down to the equipment shelf, through a cavity or a conduit behind the cladding, big enough for the thickest plug that will pass through it and fitted with a pull cord so a cable can be replaced later.
- A power point positioned so the TV and each box can be plugged in without pulling the unit forward, and reachable after the unit is fixed. A socket behind a solid back panel is a common finding at handover.
- Ventilation for the equipment shelf: an inlet low in the unit and an outlet high, so that warm air can leave by convection. A slot at the rear of the shelf is the usual solution, and a perforated or slatted door front works when the equipment must stay hidden.
- Provision for a remote receiver or infrared repeater if the equipment is behind a closed door, since many remotes do not reach through solid wood.
Heat is easy to test and surprisingly often skipped. After installation, the equipment runs for a few hours with the doors closed, and the air at the top of the shelf is checked by hand and with a thermometer. If the shelf is noticeably warm, the opening is enlarged. This takes ten minutes on site and avoids a call six months later. The TV bracket is a separate subject: its weight rating, the wall behind it, and the wall plate position are confirmed from the TV data sheet, and the fixing is made into a solid backing, not into the thickness of the cladding alone.
The photograph shows the unit at the right of the wall with open shelving above a closed lower section, with the TV recessed into a dark panel beside it.
Which finish and material choices matter most?
Three finish decisions control how the finished wall looks, and none of them can be made from a catalogue picture. The first is tone. The wall panels and the TV unit should match in colour and grain direction, and both have to sit comfortably with the floor. In the photograph the warm wood tone contrasts with a pale marble-look floor and a white wall. A small shift in the undertone of the wood, towards red or towards grey, changes how it reads against that floor. The sample should therefore be seen in the room, under the room's lighting, with the floor and wall colours next to it, and signed by the client before manufacture.
The second is sheen. A matt finish hides marks and reduces glare from the cove lighting, while a satin or gloss finish emphasises any waviness in the board. If concealed lighting grazes the panels, as in the photograph, the face of each panel should be flatter and the finish more matt than if the same panel were lit from the front. A grazing light exaggerates every irregularity.
The third is movement. Wood and wood-based boards react to humidity, and Riyadh interiors swing between air-conditioned and unconditioned conditions during construction. Panels delivered to a site that is still damp, or fixed before air conditioning is running, can open or cup later. The standard answer is to store boards in the final conditions before fixing and to allow expansion gaps at the ends, which the reveals hide.
| Finish check | How it is done | When |
|---|---|---|
| Colour match across all parts | Compare panel, unit and a floor tile under the room's lighting | Sample stage, and again at factory check |
| Sheen consistency | View batch at a low angle against light | Factory check |
| Grain sequence | Panels laid in order and numbered | Before packing |
| Edge quality | Run a hand along every banded edge | Factory check and after installation |
| Hardware function | Open and close every door and drawer, check soft-close | Factory check and site handover |
What is the installation sequence on site?
Joinery is only as good as its installation, and installation is only as good as the order of work. Parts that arrive in the right order, with the site ready, take hours. Parts that arrive on a site still being plastered take days and are damaged. The standard sequence for a wall and TV unit has eight steps, and four of them are hold points.
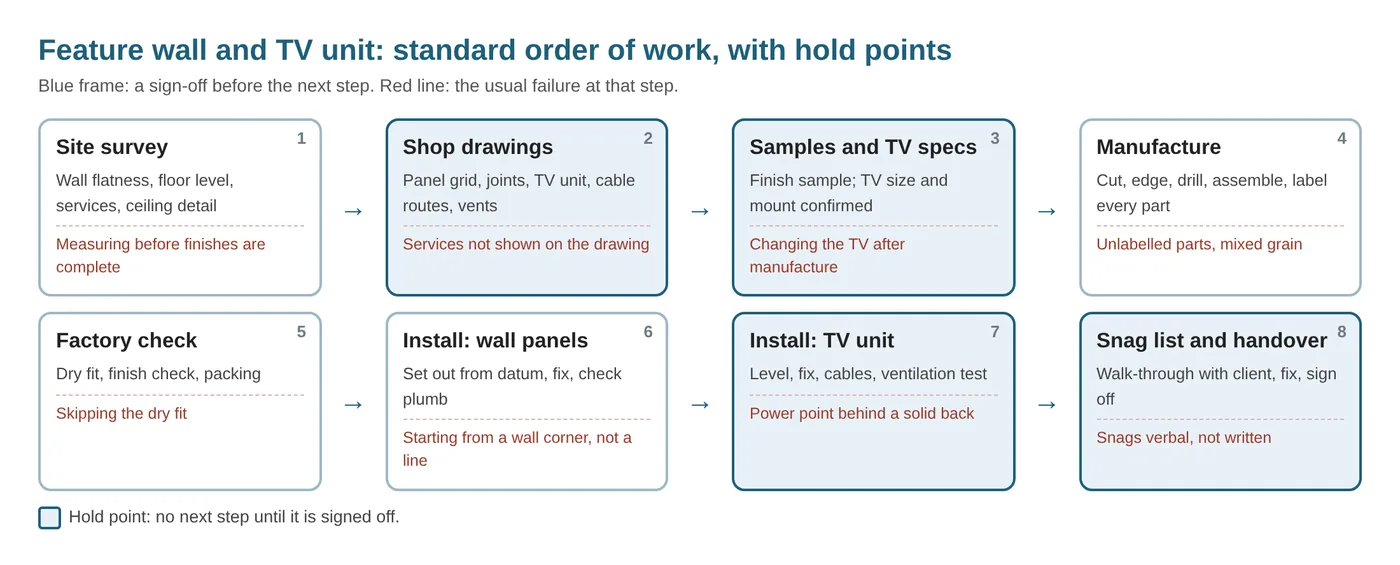
On the day, the order inside the installation matters as much as the overall order. The standard sequence on site is as follows.
1. Check the site is ready: wall finish complete, floor protected, air conditioning on, electrical first fix done, no wet trades above.
2. Mark the datum and the vertical centre lines with a laser, and transfer the drawing positions onto the wall.
3. Fix sub-frames and battens, shim them to plumb and check with the long level.
4. Fix wall panels from the visual centre outward, checking each against the line and the previous panel, keeping gaps consistent.
5. Fit the raised panel on its adjustable fixings once the surrounding panels are fixed, and check level and reveal against the datum.
6. Install the TV unit, level it on its plinth, fix to the wall and connect the cable route.
7. Fit doors and drawers, adjust hinges, run the ventilation and heat test.
8. Clean, remove protection, and walk the room with the client and the snag list.
The raised panel goes in after the side panels because it is easier to adjust a heavy panel to the surrounding strips than to adjust strips around a fixed panel. The TV unit goes in late because it is the most obvious item to scratch. Installers who start from the corner of the room and not from a datum line commonly end with a tapering gap at the far side, which is the usual cause of a rework visit.
What goes on the snag list at handover?
A snag list is not a sign of failure. It is the record that the work has been checked by someone looking for faults. A written list, signed by both sides, protects the client from verbal promises and the contractor from endless small requests. The standard items for this scope are these:
- Panel gaps even from top to bottom, no tapering
- All panels plumb within the tolerance written in the drawing, checked with a level
- Colour and grain consistent across panels and unit, no obvious odd board
- Raised panel level, with an even reveal to the surrounding panels and no movement when touched
- Switch and socket cut-outs neat and fully covered by faceplates
- Doors and drawers aligned, closing softly, no rubbing
- TV bracket secure, cable route working, power and signal accessible, no visible cables
- Equipment shelf ventilated, temperature checked after a run
- Finish free of scratches, glue marks and fingerprints; floor and wall clean
- Spare parts, keys, and the touch-up kit handed over
The visit that follows, usually after the client has lived with the room for a short period, is when sag, cupping or loose hinges show. A contractor who arranges this visit without being asked is worth more than one who delivers a perfect wall and disappears.
How does this compare with a different approach?
| Approach | Strength | Risk | Best for |
|---|---|---|---|
| Site-built carpentry | Adapts to uneven walls on the spot | Slow, dust and noise on site, finish quality varies | Small or irregular jobs |
| Factory-made to survey (the NBELCO-style process) | Controlled cutting, finishing and edging; shorter time on site | Needs an accurate survey and approved drawings | Feature walls, TV units, full villa packages |
| Ready-made units adapted | Fast and inexpensive | Rarely fits the wall or the service route; visible gaps | Temporary or low-budget fit-out |
Our own preference for this scope is factory manufacture from a verified survey, because the quality of the finish and the edges is easier to control indoors, and the time spent in a client's villa is shorter. For a view of how this applies to ceilings and cladding more broadly, see our Arabic guide to wood wall cladding and ceilings.
Questions villa owners ask about a feature wall and TV unit
How much does a custom feature wall and TV unit cost in Riyadh?
It depends on the wall size, the board and finish, the hardware, the amount of machining and the installation conditions. We do not publish prices. Contact us with drawings or photographs for a written quote that separates each item.
How long does a project like this take?
The time depends on drawings approval, the finish, and the factory schedule. A contractor should give you dated stages in writing.
Can the TV be fully hidden inside the unit?
Yes, but the design must include ventilation, a cable route and a remote solution, and the TV size must be fixed before manufacture.
Can a feature wall be fitted on a block or a gypsum wall?
Both are possible. The fixing method changes: block and concrete take mechanical fixings, and gypsum needs backing or a structural frame behind the board.
What if my TV changes after the unit is built?
A new TV of a similar size usually fits. A larger one may not. Fix the TV size on the drawing and leave a margin if you expect to upgrade.
Do I need to approve samples?
Yes. A signed finish sample, seen in the room, avoids most colour disputes. Do not approve from a screen.
Who coordinates the electrician and the joiner?
Someone must. In the standard process the joinery drawing marks every socket, cable route and light position, and the electrician confirms it in writing before manufacture.
Do you work as a supplier to designers and contractors?
Yes. NBELCO works as a fit-out joinery supplier for homeowners, designers and main contractors. Send the drawing set and the finish schedule for a quote.
Read next
- How to get an accurate joinery quote in Saudi Arabia
- Wood wall cladding and wooden ceilings (Arabic)
- Custom kitchen mistakes in Riyadh (Arabic)
- Woodwork factory in Riyadh (Arabic)
تقدّم NGIC الأعمال الخشبية المصممة حسب الطلب، والأثاث المفصّل، وحلول التشطيبات الداخلية المتكاملة، حيث تجمع التصميم والتصنيع والتقنية والتنفيذ تحت سقف واحد.